
SpeedConnect Internet Accelerator
software to boost your connection
software to boost your connection
|
How to speed up your internet connection with SpeedConnect Depending on the type of network connection you have, you might be able to tweak your connection so that the speed of your Internet, as well as your local area network, will be faster. By changing the System Registry and editing the TCP/IP parameters, you can fine-tune the values to take advantage of more reliable, faster Internet connections, such as DSL and cable. These next sections will guide you through the steps of increasing both the speed of your local area network and your Internet connection. Does your computer slow down when you browse your local area network and connect to other computers that are sharing data? One of the most common causes of this slowdown is a feature of Windows Explorer that looks for scheduled tasks on remote computers. This effort can take some time on some computers and can really slow down your browsing. The window with which you are browsing the network may appear to freeze momentarily, as the system is waiting for a response from the remote computer. Although this problem is a complex one, the solution is very simple. Instead of having to wait for the remote scheduled tasks, which is useless information to anyone who is not a system administrator remotely configuring scheduled tasks, you can disable this feature. In order to do this, you will have to change the System Registry and delete a reference to a key so that this feature will not be loaded. To do this, follow these steps:
Once you have clicked the Apply Changes button, you just need to restart and the changes will be in effect. Now your network computer browsing will be without needless delays Disabling unneeded protocols With every computer comes programs installed that you do not need. As with extra programs taking up space, extra protocols are just wasting your network connection and can actually slow it down. How is this possible? By default, a few different protocols are installed on your computer to allow for maximum compatibility with other computers on a network; these protocols each require bandwidth to operate. Most users will not use too many protocols, and their computers will use up a portion of their connection as they respond and transmit information for these protocols. Additionally, with extra protocols installed on your network adapter connected to the Internet, you increase your risk of security-related problems. One of the most common risks for broadband users is that they have the Client for Microsoft Networks networking protocol enabled on their connection. This protocol allows everyone in their neighborhood to connect to the users' computers and view any files that they may be sharing. This fact alone should be a good enough reason for you to turn off the extra protocols. But with them disabled, you will also save a little bandwidth as well. Viewing protocols on your network adapters
Disabling a specific protocol It is highly recommend that you disable all protocols except for the TCP/IP protocol (also referred to as the Internet Protocol). Doing so will optimize your adapter for speed and security. Be aware that if you remove the Client for Microsoft Networks protocol and the file-sharing protocol, you will no longer be able to share your files. Additionally, you will no longer be able to connect to remote computers to view their shared files. Also keep in mind that if you have multiple adapters in your machines, such as a wireless adapter, a wired network adapter, and a dialup modem, you will have to repeat the preceding instructions for each adapter. Tweaking your Internet connection for speed Almost every computer user has different Internet connection conditions. Some users have very high-speed connections, while others have slow connections. Some users have high-speed connections using cable-based technologies, while others have high-speed connection through DSL-based technologies. On top of these differences, some are located farther away from their local network switching station than others and have a higher latency (delay) on their connections because of the distance the data has to travel. All of these different connection conditions make every user unique. The TCP/IP protocol settings can be optimized for best speed under each of these situations. By default, Windows has these settings set in a "one size fits all" approach. As I mentioned earlier, Windows has to be abstract in certain areas because of its broad user base. Because of this approach, many users can fine-tune their settings to be optimal for their connection conditions. Doing so will optimize the data transferred so your network connection will be more efficient, leading to high speeds. With a little help from some fine online tools and software programs, you can test your Internet connection and decide what needs fine-tuning. The process of tweaking your Internet connection is not always easy, but it is doable.
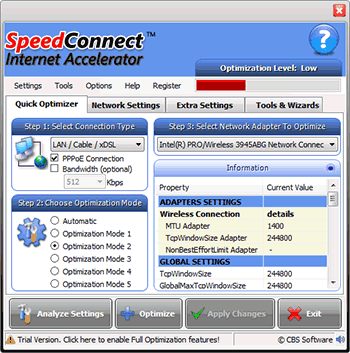
The next step in the tweaking process is to get all of the software that is needed. The main software program that you will use is SpeedConnect Internet Accelerator, which is developed by CBS Software and is available for download at http://www.cbs-soft.com/download.htm Detecting settings with SpeedConnect Internet Accelerator Once you have downloaded SpeedConnect, you are ready to start getting information to use with the program. The first value that you will need to detect is the Maximum Transmission Unit (MTU) of your connection. To do this, you will use the Find Best MTU Tool available on SpeedConnect's Tools&Wizards panel. Follow these steps to find the best maximum transmission unit to use for your connection:
Optimizing your connection with SpeedConnect Now that you have the BEST MTU value detected, you are ready to enter this information into all your future optimization tests. Open SpeedConnect and select the Quick Optimizer panel, then follow these steps to run your first optimization test:
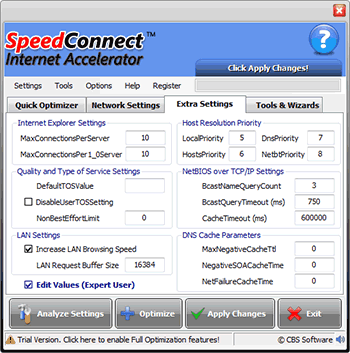
You are now finished with your first process that will optimize your Internet connection. That wasn't too hard now, was it? It is very important to try all the optimization modes, in order to find the best optimization for your internet connection. This means, you have to repeat the above steps (1-10) EACH TIME you are making a new optmization. Then, restart, retest your connection speed, until the best result is obtained. This is all about experimenting, and it takes some time. After all, it is a one time process. Once you will get the best optimization for your connection, you will not need to use SpeedConnect until you decide to change some settings or restore your default settings. Network Settings / Extra Settings (for advanced users) If you want to change any settings manually or if you just want to check the values proposed by SpeedConnect, you can always switch to Network Settings or Extra Settings panels.
|
"CBS Software's SpeedConnect Internet Accelerator tops overall." PC Magazine Review
"SpeedConnect can automatically work out the best way to squeeze that extra bit of speed out of your computer"s Internet connection." InternetADVISOR

"CBS Software's SpeedConnect Internet Accelerator tops overall." PC Magazine Review
"SpeedConnect can automatically work out the best way to squeeze that extra bit of speed out of your computer"s Internet connection." InternetADVISOR
|


 For Windows® 10,8,7,Vista,XP.